Feeds:
Posts
Comments

I have long wanted to try glass combing.  I actually bought the combing rod at a Glass Convention probably in like 2012.  But some projects always seem to get pushed to the back burner especially if they include any uncertainty as did glass combing.  

For good reason, there are many warnings with glass combing are you are opening the kiln when it is at a very high temperature and as we all know, hot glass can be dangerous.  I had read the warnings on Glass Campus about wearing welding jacket or similar protective gear and I didn’t have this.  And basically is all sounded scary.

Then one day I decided to just go for it.  I have opened my kilns before when they are hot to check on a pot melt or whatever and it wasn’t that bad.

To get prepared, I got out:

* welding gloves

* welding sleeves (borrowed from my husband)

* glasses with UV protection

* all cotton clothes

* Fitbit removed

* hair pulled back in a pony tail

* rake or comb

* bucket of water to cool the rake

First attempt

I wasn’t sure if I was supposed to use a solid piece on the bottom, so chose white and then other colors for the top including black. I laid the white on the shelf and then 3/8” strips on end on top, all dammed of course. It took a very long time for the kiln to heat to 1638 degrees and while I read to wait till it got to 1650 degrees, I gave up, opened the kiln and did one pull. I was afraid to do more than one pull in case it cooled a lot. 

I could hear the glass crackling the entire time which was a little disconcerting but since I wasn’t sure what was normal, I hoped for the best.

Since the kiln had cooled to about 1550 degrees, I had to wait for it to heat back up to 1638ish for another pull.  This took at least another hour.  

Just so you don’t need to wait for the punch line on temperature, let’s do an aside here.  My kiln is probably not the best for this task.  It is a glass kiln whose top temperature is 1700 degrees with the elements in the lid which I am lifting and letting a lot of heat out. I have learned since then that better kilns are those where you can drop the shelf or clamshell-like where the heat stays in the lid as you expose the bottom and so a reheat to the top temperature should only take 10-15 minutes.  Another reason mine is bad is that because it takes so long to get to that top temperature, the glass is hot for a very long time which is not a good thing.   

In the end, after doing 3 pulls, cooling and annealing for a very long time (4 hours to be on the safe side) and a slow ramp down to cool, I opened the kiln.  The glass was in many pieces.  I asked for advice on several Facebook groups, but most couldn’t tell me what was wrong.  My pictures looked okay.  I have read that whites can be finicky and I had a lot of white including the entire bottom sheet.  

Second Attempt

For my second attempt, I did not put a sheet on the bottom under the strips and used a lot more transparent colors of glass.  The rest of the process was the same as above as I couldn’t change anything about the kiln.  In this case, it did not crack and the pulling was okay although I realized I should have pulled more to have a more visible pull.  However, in this one, you can see in the picture how the glass merged together and there is a sheen of green transparent across almost the whole top, sort of like it was more viscous and so flowed more.  

I also learned that I can be very heavy handed and put a scratch in my shelf by taking the rake too deep.  

I just took a class from Janine Stillman of Designs by J9 and learned that because of my long heat times, her phrase was that “it gobbles as it floats to the top and takes over the top.”  So I lose some of the colors and the definition.

I was ecstatic though that it did not crack and I actually got it to a finished piece that a customer loved.

Third Attempt

I decided to go with blues for this attempt and because of the green transparent taking over in the 2nd attempt, I used less clear.  And for this one I got impatient and tried the pull closed to 1600 and you can see in the center pull how it stuck to my rake and left thin lines of glass as I pulled the rake out.  It made an interesting affect for the blue as almost looked like a jelly fish but of course was not planned and probably not really a good thing for combing. You can also see more definition in the blues. 

Fourth Attempt

Then life got in the way and it was almost 2 years before I was able to try again recently.  I was inspired by a rainbow picture where I could clearly see clear between the colors and wanted to try this.  So I did another lay up, but since I didn’t take good notes, I used a sheet of clear on the bottom.  I also can’t find a picture of my lay up, but for the strips, it was one strip color, one strip clear and so on.  I didn’t quite get it to look like the inspiration picture as again the colors merged together more but each one I do is getting better.  

In addition, I thought I had gotten some reactions going between colors which I really did not want, but it also could have just been overheating some of the colors.  Not sure on this one.  

Photo Credit: Jerry Schneider

I am writing this as I sit at the annual Glass Convention in Las Vegas and having just taken the class from Janine.  

So what are my lessons learned:

1) I don’t need a bucket of water, just a bowl and instead should be more willing to dip the rake into the water before doing a pull.  

2) You get different effects when you push versus pull, so I have to keep that in mind in my design.

3) As mentioned above, my kiln is not ideal as I cannot access my kiln from all four side and if I want to keep doing this, I might try a different kiln.

4) Clear glass is great to use and adds more visual interest.

5) Don’t be afraid to work smaller and use as a part sheet.  Again who knew!  What a great idea!

6) It doesn’t matter if you use a full sheet below or not as long as you have 1/2” depth, so make strips wider if no sheet below.

I am so glad I tried this technique and also that I took Janine’s class and I can’t wait to get home and try some different things to see what other pieces I can make.  

One of my galleries, Backstreet Gallery, holds special exhibits every so often and this time we were asked to create something showing warmth for Valentine’s Day. I didn’t want just your typical heart and came upon a graphic showing hands holding a heart.  

Of course, I am always behind and this time was no exception. And when I am behind and in a hurry, I don’t always think things through.  I had carefully calculated how many days I would need in the kiln and made time three days before the deadline to get the first phase done.  What I didn’t take into consideration was a pending big storm which knocked out power. I knew it was coming! What was I thinking starting the kiln!

We lost power just as the kiln was ramping up and was approximately 1265 degrees F.  This meant no annealing on the way down to room temperature.  After we finally got power 2.5 days later, I decided to fire again hoping that going through an anneal cycle this time would be okay and the piece would not crack.

It cracked into 3 large pieces.  I could not say for sure though that the crack was caused by the loss of power.  My lay-up was a single sheet of 3mm white, on which I then placed the red heart and the black hands were overlapping the red heart.  So some areas were 3mm and some areas were 9 mm.  I took it slowly on the way up and then annealed it for 3 hours.  The crack definitely happened on the way down.  I have had difficulties before when the base layer was a single 3mm sheet.

Therefore take two involved first firing a base of 3mm white and 2mm clear.  Then I added the red heart and the overlapping black hands.  This time I went from 5mm to 11mm. This time I went even slower on the way up, and again annealed for 3 hours.  No crack this time! I like the sturdier base and my piece is finally at the Gallery albeit 2 weeks late.

Next time I will pay attention when I get a weather alert! Happy Fusing!

I would love to be a painter, but I think I had better stick with glass.  I never like my attempts at painting, but recently decided I may be improving as while I don’t like the end products, other do.  Here are two examples.

The first plate was for a challenge called “Spring Glorious Spring”.  For this challenge I decided to try my hand at Claude Monet’s Garden in Giverny.   From reading various tutorials, it seems like you are supposed to apply frit in batches firing in between to get a scene just right. 

I started with a fused base of green and white swirl 3mm glass and clear glass. I then applied powder in greens, yellows and browns to try to match the painting.  I then applied larger frit.  After learning about perspective, I made sure to apply the larger frits in the foreground and the smaller frits in the background.  I personally didn’t think my version looked anything like Monet’s (sorry, Monet), but others did and loved it. 

Fused Glass Plate based on Money’s Garden in Giverny
The Artist’s Garden in Giverny (1900) by Claude Monet. Original from the Yale University Art Gallery. Digitally enhanced by rawpixel.

Recently I tried again.  I saw a painting that was based on Van Gogh’s Starry Night, and thought it would look great on a night light.  I used Colorline paints to paint on a 3mm sheet of glass.  I tried using a plastic tool to get the lines through the blues, but that didn’t work.  My next goal was to wait until the blues dried and use white to make the swirls and add some yellow blobs, but hmm, I forgot.  I added course clear frit to the top and did a contour fuse at about 1350 degrees F.  

Again, I didn’t think my nightlight looked anything like the original (sorry, Van Gogh).  But then I showed the nightlight to my husband and he immediately thought of Starry Nights, although his comment was, “Have you ever thought of doing them from paintings like Starry Nights?”  I had to share that that was what I had tried to do.  Oops.  But he said it was a success because it did make him think about Starry Nights.

Fused Glass Nightlight painted similar to Starry Night
Van Gogh’s Starry Night image from Wikimedia Commons

Moral of this story, I need to keep trying.  Some will work and some won’t.  Glad these two did!

As we all do, I have been known to change my mind.  In a recent post, I shared a tapestry piece (based on work by Richard Parrish) and said I wasn’t sure I was patient enough to do another.  Two things changed my mind.  First, that piece sold and I was sad to see it go.  Second, I had a gestalt on the strips – make them longer and then you don’t have to piece together a bunch of small pieces.  You will end up with lots of extra little pieces though.  

This time, I made a quite large part sheet and cut the strips.  I was then playing with arranging them in a sort of flowing pattern when my husband said, “If you are going to do a sine wave, you have to do it right.”   He figured out based on my glass size exactly what the offset of each strip would be to do an exact sine wave and then I implemented it. 

Stringer Set-up in Kiln for Part Sheet

Arranging Strips before Cutting

Sine Wave Set Up in Kiln

Fused Glass Sine Wave Platter

Next up, I had some extra strips of stringer part sheet and was playing around with patterns mixing it with other colors of glass when my husband (yes, he has great ideas!) suggested that I should do a sunburst.  It took awhile to figure out a template for the black pieces, but once there it wasn’t too bad.  

Fused Glass Sunburst Platter

Things don’t always work out as planned though.  I have been making my part sheet with 3mm Tekta clear but then the part sheets are more than 3mm which takes extra work and glass when combining with other pieces of glass.  This also means you have to be extra careful with your schedules for proper annealing as the piece is thicker.  My latest piece, again using extra pieces, must have cracked on the ramp up as you can barely see the crack, but it is there (starts at bottom on third purple from the left and heads up and to right).  I should have ramped slower.  Guess I will break out the tile saw as this will become a part sheet for coasters or smaller dishes.

Work in Progress with Crack

My next attempt will be to make the part sheet with 2mm Bullseye Tekta and then perhaps it will end up as a 3mm part sheet and easier to work with in a final project.  Stay tuned.

My Screen Printing Results from Class

Several years ago I was very fortunate to take a screen printing class at Bullseye Glass Studios in Portland OR.  It was awesome.  I learned so much about all the different tools and techniques as well as mixing colors as the two instructors were great.  The above are my creations from the class and I will never part with them!  The optical illusion one was particularly challenging as I had to take the picture, separate out all the different colors into different layers, screen print each one onto a different sheet of glass and then combine all the layers trying to carefully line them up.  It was ambitious but so very rewarding and it very much satisfied my engineering slant to life.

Fast forward to present day and I still have not had the time nor the desire to pony up for a screen printing exposure unit.  Therefore I am currently using pre-made screen prints which I purchase from AAE Glass.  I have also only bought black silk screen paste hence why all my projects are using black.  A small container goes a long way but it is quite the investment.

Here are my first attempts using the simple screens.

Screen Printed Coasters

Screen Printed Coasters

Screen Printing with Touch-ups

Screen Printing with Touch-ups

Lessons learned:

1.  If you are doing something like coasters, and want to do several, use blocks to ensure you put the glass in the same place each time,

2.  I could only print 2 coasters before I needed to clean the screen.  It could be that my paste was too thick, but it spread nicely.  So I just think the screen gets messy and then hard to keep the other areas on the glass clean.

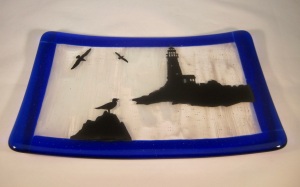
3.  On the lighthouse one, I ended up not quite getting things lined up as well I as had thought and I could see a gap between the black enamel and the darker blue border.  So I used a brush to add a little more.  You can tell it is not quite the same.  The silk screen has no blemishes whereas where I painted it is not quite as smooth.

So now for a comparison.  Over the years I have used plastic stencils I buy or even cardboard ones I make combined with glass powder to create different patterns.   I tape these stencils onto the back of a fine mesh screen and then use a similar technique to screen printing only using glass powder.  

Powder Printing

These work quite well and are definitely pleasant to look at.  The difference is crispness.  With the stencils and powder, it is difficult to ensure an even thickness of powder everywhere and so you have some areas darker and some lighter.  Given other inconsistencies in working with glass, it all adds to the beauty of handmade, but if you are after crisp colors, go for screen printing!  I think I just convinced myself to buy another color of paste!!!